


HP 940, 940XL Ink Cartridges
Usage Tips
NOTE: “Empty” and “Low Ink” alerts are COMPLETELY NORMAL for HP 940/940XL ink cartridges which have been refilled! While at first this may be an unusual  workflow, it does allow print operations to proceed.
With a newly refilled HP 940 cartridge (HP original/genuine cartridges), you will observe ‘low ink’ alert messages. HP does not allow an automatic reset of the electronic chip on the cartridge after a refill, so the ink level indicator is sending a false message that the ink level is low. Your cartridge is not low on ink, and nothing is wrong with your printer or cartridges.
HP 940 Refilled Ink Cartridges – Low Ink Warnings & Alerts
Your printer/computer will display “ink alert” message(s). Press ‘OK’ to dismiss this prompt. Additional alert messages, such as “non-genuine cartridge” or “fraud” may also be displayed. Press ‘OK’ or ‘Dismiss’ to bypass these prompts.
Since the ink level indicator is not re-set, it is not ‘feature usable’, meaning that you just need to ignore incoming ‘ink low’ alert messages as they appear as part of your printing workflow. Continue to print until you notice a missing color, then replace that color.
Caution
Immediately suspend printing if you notice one or more colors are missing in printed output, or damage to either of the built-in printheads may result. Initiate ‘Clean Printhead’ to help resolve. If necessary, return respective ink cartridge(s) for an ink fill validation check.

If any streaks or missing colors appear on prints the cartridge may be suffering from an air bubble within the internal ink spout. Initiate a “Clean Printhead” procedure via the printer control panel Setup/Tools menu.

To help identify which color cartridge is empty, print a test page via: 1) your printer control panel or 2) via an Inkjet411 test print:
A faded or missing color indicates empty.

Keep a spare set of ink cartridges, for convenience. As an in-printer cartridge is depleted, remove it for refill. Insert the spare into the printer and save the refill as the next spare.
Cartridge Errors (no printing allowed):
As the electronics in the ink cartridge and the printer communicate with each other, sometimes the printer will incorrectly identify an ink cartridge as unrecognized or non-functional. Following ink refill, if the HP 940 ink cartridge(s) is not initially recognized, then the check cartridge to printhead connectivity (remove and reseat the ink cartridges).
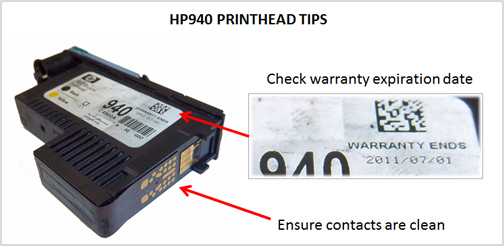
If the problem persists then verify the HP 940 smart chip is present (see photo below for correct positioning) and ensure gold contacts are thoroughly clean. No ink residue should be on contacts – clean with lint free towel and isopropyl alcohol as necessary.

Keep a spare set of ink cartridges, for convenience. As an in-printer cartridge is depleted, remove it for refill. Insert the spare into the printer and save the refill as the next spare. If you observe an “Expired black ink cartridge”, this error may be bypassed by performing either of the following:
1. Press and HOLD the printer’s ‘Reset/Resume’ button for five (5) seconds.
…OR….
2. – Press and HOLD the Power button, press Resume button 3 times, then release the Power button (older HP 8500 models only)
 Example above: Non-severe error message (can typically be bypassed)
Need to ‘reboot’ printer to print each job (8500A Plus printer models):
Instead of powering off the printer on the next print job attempt, try opening and closing the cartridge access door to see if the print job can be performed successfully. If it does, then this will confirm there is a probable cartridge connection (‘ordered detection’) issue or a possible printer driver ‘hand-shaking’ issue.
Verify cartridge to printer connectivity (NOTE: if you have a mix of refilled ink cartridges and HP manufacturer/original cartridges in the printer at the same time, this can sometimes confuse the printer firmware from operating correctly).
1. Remove all four ink cartridges from printer.
2. Inspect the smart chip contact surface (located in bottom/rear portion of cartridge). If there is any ink on the surface of the chip please clean thoroughly using isopropyl alcohol dampened lint-free towel, or similar.
3. Install one cartridge at a time and allow printer to sense each cartridge, one at a time (i.e. install cartridge, close door, allow printer to sense the cartridge, then open door and install the next cartridge, etc.)
4. After installing all four ink cartridges, retest printer.
5. If problem continues, then we suggest you press and hold the reset button on the printer for five seconds…this will reset the cartridge’s smart chip, and may correct the current ‘interface’ issue.
6. If the problem persists and a mix of refilled and HP original cartridges are determined to be in the printer at the same time, then it is suggested to either install all refilled cartridges or install all HP original cartridges to rectify the issue.
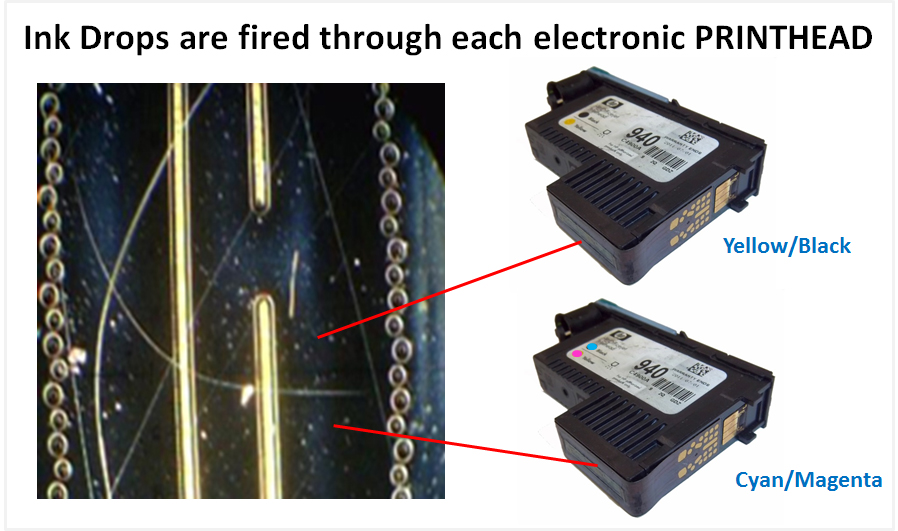
Printhead Failure Condition:
If you observe “The Following Printhead Appears to be Missing or Damaged” or “The Following Printhead has a Problem”, then this type of problem is usually severe in nature and is typically caused by failed micro-electronics within either of the two (2) PRINTHEAD assemblies. Resolving this type of failure typically requires replacement of at least one of the PRINTHEAD assemblies (either the Cyan/Magenta printhead or the Yellow/Black printhead).
If these solutions do not work, we recommend that you visit your printer manufacturer’s website or talk with their technical support organization. If you think the refilled cartridge might be bad, take it back to your refiller and have them re-check the cartridge.
Recommended Solutions
The contact between the ink cartridge and the printer must be clean for proper functioning. If any dirt, ink or paper dust is on the contacts, the printer may indicate that the ink cartridge is bad. To ensure a clean contact, follow the steps below:
Step A: Remove and re-install the cartridge(s)
1. Turn the printer on; open the cartridge access door.
2. Remove the suspect cartridge(s) from the station.
3. Re-install the cartridges in their stations at left side of printer.

4. Close the printer.
5. Turn off the printer for a few seconds and then turn it back on.
6. Print a test page following your printer’s instructions.
7. If this does not work, please proceed to step B.
Step B: Re-set the printer
1. If the problem has not been fixed it may be useful to perform a “hard reset”. This can correct an electronic flag setting inside the printer telling it that the print cartridge is problematic. Please refer to your printer’s user manual or the manufacturer’s website for the correct “hard reset” procedure for your printer. Often times it simply involves turning off your printer and unplugging it for at least 30 seconds.
2. Print a test page to determine if the problem has been resolved.
3. If the problem persists, you may need to purchase a new printhead assembly. Refer to Step C.
Step C: If printer errors persist or poor print quality cannot be corrected, then one of the respective PRINTHEADS might have a connectivity problem (i.e. dirty electrical contacts), may be out of warranty (at end of life) or has electrically failed internally and may need to be replaced. Remove and inspect suspect PRINTHEAD assembly. It is suggested to refer to manufacturer instructions for your printer model; the steps below are provided for general guidance only.
NOTE 1: one printhead assembly is responsible for Yellow/Black printing, while the other assembly is for Cyan/Magenta printing. Refer to video which illustrates how the printheads function: https://de.inkjet411.com/?page_id=2054
1. Open the top cover to access the printheads. The carriage should move to extreme left side of unit (if not, press and hold the ‘*’ (star) button on control panel until carriage moves all the way to extreme left of printer). If not, power off printer, then power on. Repeat until carriage moves to extreme left side.

2. Lift the blue printhead latch to gain access to the 2 printheads. Remove and replace with new printhead assembly.

3. Lower the blue latch handle to securely lock the printhead assemblies into place (ensure the blue latch fully snaps into the locked position).

4. Close the top cover. Allow the alignment page to print; this will help confirm if the problem has been fixed.
HP 940 & 940XL Ink Cartridge Refilling & Care Tips:
The Yellow/Black and Cyan/Magenta PRINTHEAD will eventually fail over time with usage and age.
Advanced Diagnostics
To view advanced diagnostics tests for your printer model, click here:
Printhead Life
Both PRINTHEADs will eventually fail over time with usage and age.
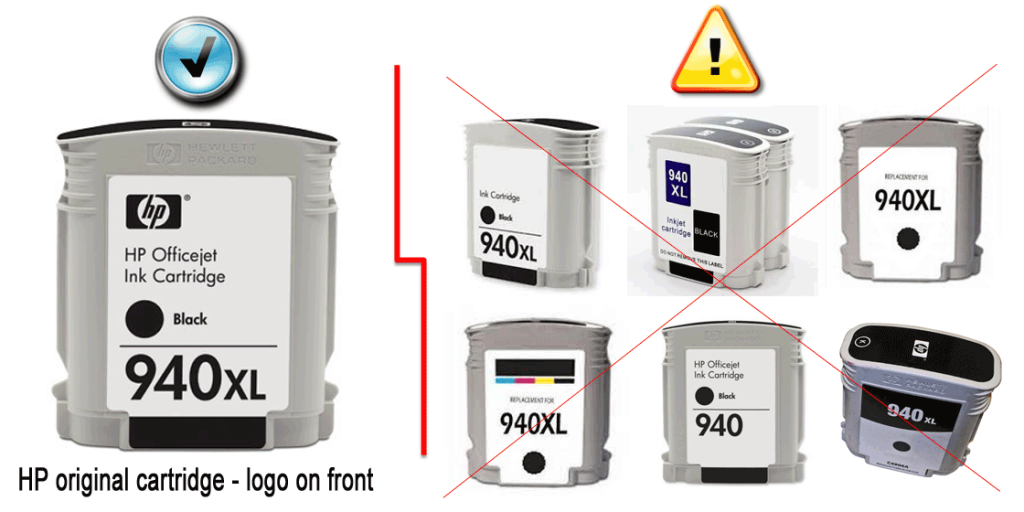
NOTE 2: A compatible, remanufactured or re-branded ink cartridge can be problematic; the smart chip (at base of cartridge) may not provide reliable printer-cartridge connectivity once installed. Compatible cartridges are typically purchased on-line or at select retailers (i.e sold under a different label than the regular HP cartridge packaging) and is essentially a “remanufactured tank” of the HP original/genuine ink cartridge. For the best refilling experience, only use HP original/genuine ink tanks.
Refill Center Locations:


